
Being a Big-data developer, one of the biggest challenges I faced initially is installing and configuring a development system for trying out the Hadoop framework and for running my Hadoop code. The whole BigData architecture by nature is distributed across multiple commodity hardwares, with multiple services running and coordinating the cluster. If all this sounds complicated, it indeed is and if you see the code for writing a WordCounter application (The “Hello World” of MapReduce), the number of lines of code itself is very less as compared to all the setup work which you need to do before you can successfully execute your program. Hence, in this article I will provide a step by step tutorial to get the Hadoop setup running as quickly as possible so that you can start with the development.
The focus here is on speed and writing code (not Cluster Maintenance), so I’ll be going with the default configurations as much as possible and will only change those values which I absolutely need to. Going with that notion, I’ll be showing how to install the Hadoop setup in a Pseudo distributed mode, which means all the services of hadoop daemons run on different JVM instances (separate processes) on a single virtual machine, simulating a cluster on a small scale. The advantage of this approach is that when you want to run the code on an actual Hadoop Cluster, you won’t have to make any changes in the code & merely changing the configuration file is all that will be needed.
The tutorial comprises of the following sections. You can click these links to directly go into any specific section.
- The Requirements
- Getting the hardware ready (Optional Speed boost)
- Importing the VM
- Configuring the Cluster
- Setting up SFTP for File transfer
- Downloading the Configuration files from the Cluster
- Cloning & Importing WordCounter
- Configuring the WordCounter Project
- Executing WordCounter
- Closing Notes
About the Hadoop distribution, though there are multiple versions available from multiple vendors, I’ll be going with Cloudera as its more popular. They also offer a QuickStart VM, which is a VM image of a CentOs Linux which has Hadoop installed and preconfigured.
The Requirements
- On the hardware front, you’ll need a system with at least 6 gigs of RAM. And as with hadoop, the more ram, the better !!!
- As for the software – VirtualBox is the virtualization software we’ll use.
- The QuickStart Vm image. (direct download link)
- FileZilla – Stfp client.
- Java JDK 1.7
- Along with an IDE like Eclipse.
Getting the hardware ready (Optional Speed boost)
Once you’ve downloaded and installed VirtualBox, reboot your system and go into the BIOS. Accessing BIOS will be based on your system and motherboard manufacturer and can be searched online. The goal here is to enable Virtualization support. By doing so you can assign more than one Cpu core for the Vm in VirtualBox, which results in a tremendous speed boost in the processing as well as the general responsiveness of the Vm. Though this step is optional and technically things will still work even if you skip this step it’s highly recommended that you enable virtualization.
Importing the VM
After downloading the QuickStart VM image, which is a pretty hefty download at around 5gb, extract the zip file and you’ll find 2 files. Open the “cloudera-quickstart-vm-5.10.0-0-virtualbox.ovf” file (the smaller file).

This should launch VirtualBox and open the import wizard.
In the import settings,
- Change core count to 4 or more depending on the number of cores offered by your processor (will only work if you enabled virtualization)
- Untick Dvd drive to speed up the VM boot time.
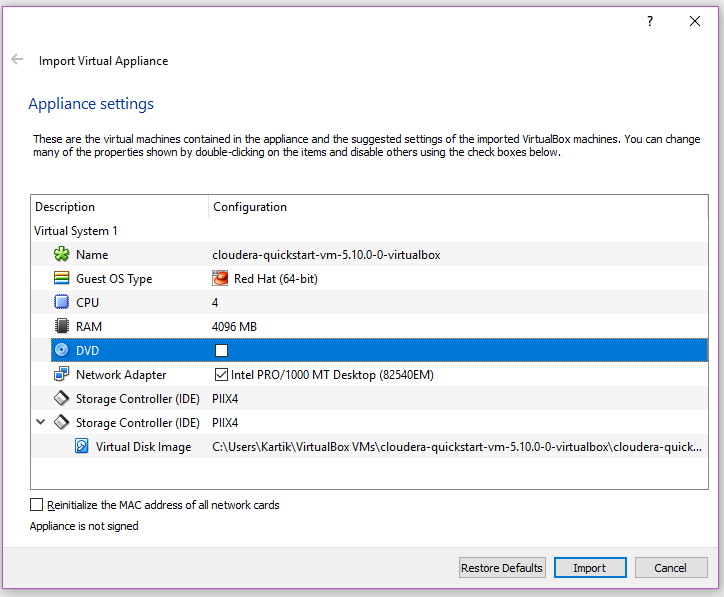
Click import & after it’s is finished, you need to “Enable a network adapter” and add a card in the form of a “Bridged adapter” so that your VM gets an IP address which your Windows OS and your code will use to communicate with the Hadoop cluster running inside the VM.
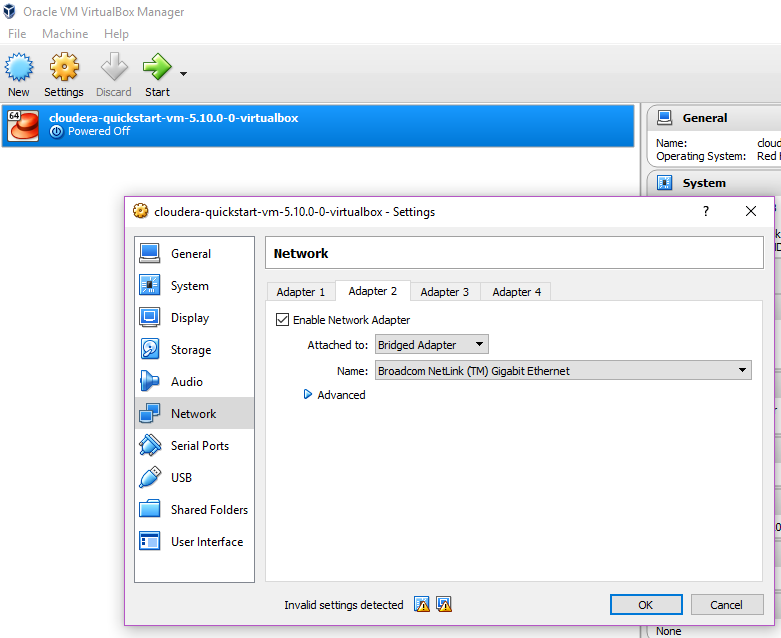
Also enable Shared Clipboard :: Bi directional so that you can copy-paste text between your VM and your Windows OS.

Configuring the Cluster
Now that you’re done importing the VM image, it’s time to boot it up. The first thing we do now is finding the IP address of the cluster. This is enabled due to the Bridged adapter card we added to the VM during the import. Open terminal and run “ifconfig” which will list all the Ip addresses currently associated with the cluster.
There should be 2 ethernet cards “eth0” and “eth1“. Check the Inet addr of eth1 and note the IP. This is the IP of your cluster. Then from your Windows OS open your browser and type in IP followed by the port 8888 (eg http://192.168.0.104:8888/ in my case) which is the default port for Apache H.U.E (which stands for Hadoop User Experience).
You can check this link for a list of all the default ports used by the Cloudera Cluster.
You will be presented by the HUE admin page and the default username and password is “cloudera” after which you can login and see your cluster !!!

Now that you’ve found the IP addr and verified it via your browser, the next step is to add an entry in your hosts file in windows. It’ll be situated in “C:WindowsSystem32driversetchosts” open it with any text editor and add in YourIPaddress quickstart.cloudera like this. This will be needed for running the code as the configuration files which we will download from the Cluster will have its IPs in form of quickstart.cloudera and your Windows OS needs to be able to resolve that address into the IP of your Cluster.

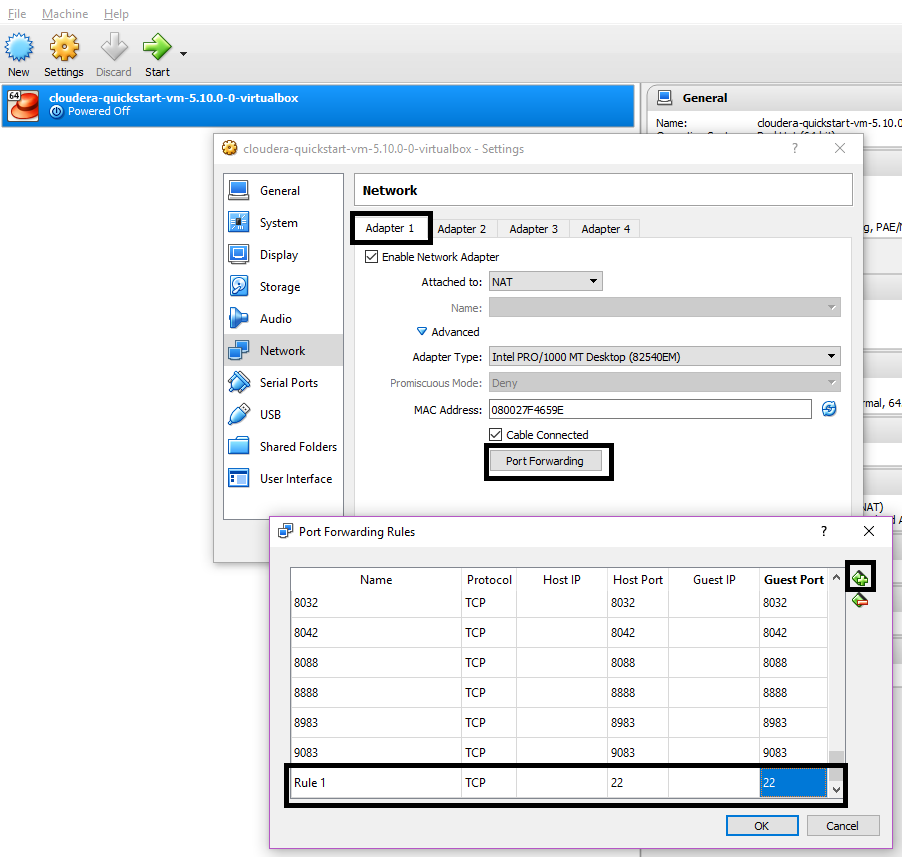
Now if you’re installing this guide on your office system, there might be chances that the VM wont get an IP address of its own due to the security policies blocking IP assignment. You can confirm this if your eth1 has Inet addr 10.0.2.15
In that case, the default IP address 192.168.56.1 will be assigned to your cluster & you will have to manually forward any other ports which you need to use other than the Cloudera Default ports (which are already port forwarded).
Here I’m forwarding port 22 so that i can SFTP my cluster to transfer files.
Setting up SFTP for File transfer
Now transferring files between Windows and your VM can be done in myriad ways, including setting up Samba, Shared folded or FTP. I’m going to show the SFTP approach here, which i find simple enough.
For this, we need to
- Install a STFP server on the Vm. We do this by executing “sudo yum install vsftpd” and then
- Doing a restart by “sudo service vsftpd restart“.
- Finally “sudo service vsftpd status” shows us the status of the SFTP service

On Windows we need a SFTP client which provides us a GUI used for file transfer across the VM. I use FileZilla as its my preferred FTP/SFTP client. Enter the IP addr of the Cluster, username and password as “cloudera” and port 22 and hit QuickConnect. You should now be able to see the VM in the RHS panel and your windows on the LHS and can drag drop and move files across them.

Downloading the Configuration files from the Cluster
You now need to download the configuration files for the Cluster by going to “/etc/hadoop/conf.pseudo” (you can also copy this path in remote site and enter). This directory contains a lot of .xml files which tells the program where to connect. Using Filezilla, SFTP to the above location and download all the files present in this directory. There should be 8 files and other than the readme, copy all 7 files to your Windows PC. We will need those files when we run the WordCounter program.

Once you have downloaded the configuration files, open them with any text editor and replace all “localhost” with “quickstart.cloudera” in all the files . Having localhost would work if we execute the code inside the cluster but since as we are going to execute the mapreduce code from our system, we have to point it to the Cluster (this is why we added a DNS entry for quickstart.cloudera in our Hosts file).
At this point, the cluster is ready and now the only thing left to do is to test WordCounter program to make sure that our setup is working.
Cloning & Importing WordCounter
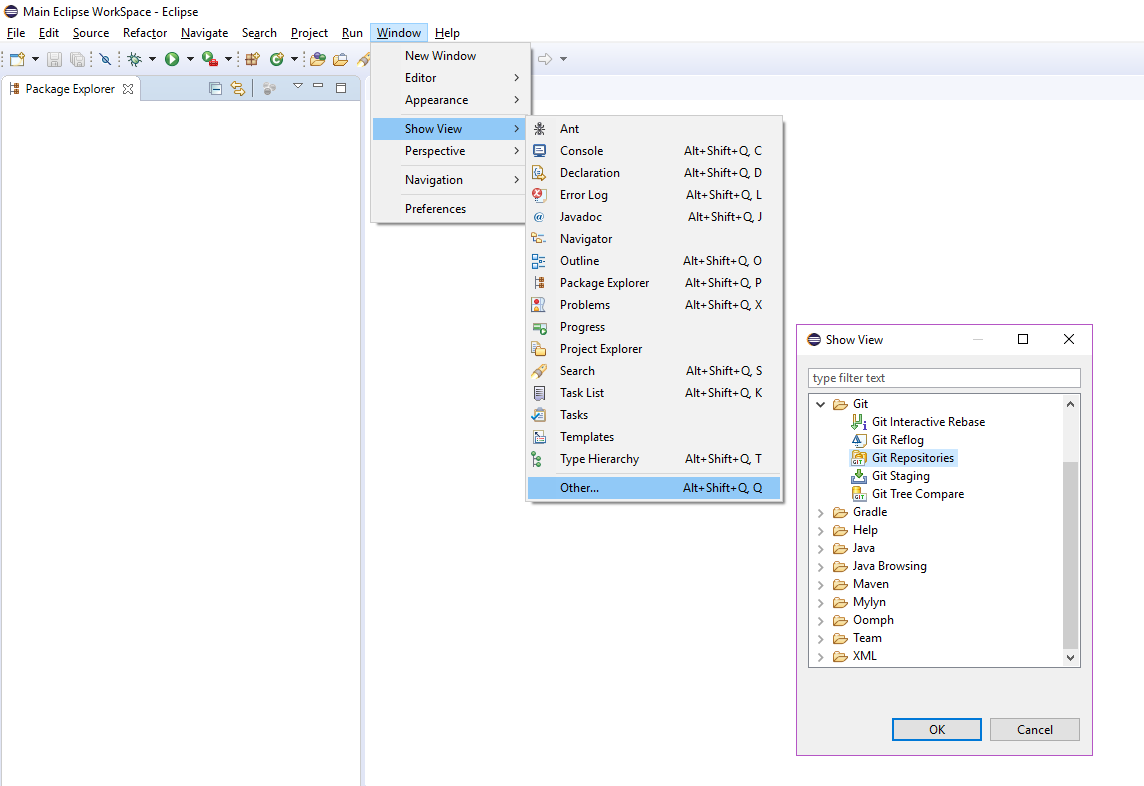
For the WordCounter program, you can either lookup the code online or import it directly from my GiHub into Eclipse (or any other IDE). Open the Git Repositories view in eclipse.
Click Clone a Git repo and add in the link to my git “https://github.com/kitark06/xWING.git” which has my version of WordCounter project. Before finalizing the import, tick Import all existing eclipse projects.. and wait for the project to be copied.

Once the import is done, Eclipse should automatically trigger a Maven build and all the dependent Hadoop libraries required for this project will downloaded. Also download the Windows binaries for Hadoop and extract it in the root directory of your C drive.
Configuring the WordCounter Project
Close to the final part of the tutorial, some changes are required on the WordCounter project. There is a missing jar error which needs to be fixed. Go the project build path settings and then remove the missing Jar.

After removing that missing jar entry, the project should compile. Now its time to create the missing jar and add it back to the project. This jar contains the Map and Reduce code which will be sent to the cluster.
Inside the project there will be a file called hadoop-vm-works.jardesc, executing which will export the bundle the resources and export the jar at this location D:HadoopTrainingmapreducejarshadoop-vm-works.jar in your computer. With the jar created add it back to the build path of the project. From this point onwards, you can directly execute the jardesc file to create and export the jar in the mentioned location.
This step needs to be done each time mapper or reducer code is changed but not required for changes made to the Client code.

With that done, goto http://quickstart.cloudera:8888/filebrowser/ (hint :: username and password is cloudera) and create a folder called input and upload any text file inside it. This serves as input to the WordCounter program.
Executing WordCounter
The code containing Main class is inside the WordCountClient along with the WordCountMapper and WordCountReducer code inside the com.kartikiyer.hadoop.wordcount package.
One final thing before running the code, you need to configure the run parameters to add the Hadoop config folder in the classpath so as to make sure the Client application can connect to the hadoop cluster using config files.

And with that, after all that time and hardwork, Success at last !!!

A small thing to notice is that if you see such an output on the console where in your program can’t connect and the cluster IP is 192.168.56.1, then in that case it means your organization/network did not allocate an IP address to the VM & there is a connectivity issue between Eclipse client and the cluster. This does NOT mean that the job has failed, as you can see in the image below that it did successfully finish. So it’s best not to kill the execution of the code midway if you see errors on the console and let it execute till it ends (either in success or failure).

Closing Notes
Though it’s been a long and daunting task of doing all these things correctly, we have successfully setup a dev cluster, and have executed the WordCounter program.
There are a couple of gotchas to note here which are easy to miss and could cause problems down the road.
- In the client code shown below, the highlighted lines in the snippet are the ones which are location dependent.
- Line 23 is the path in windows where we extracted the Hadoop Windows Binaries and its location should match the extracted file’s location.
- Line 47 is the input path for the program in the cluster. This path should only contain files (having subfolders in input dir will crash the program)
- Line 51 is the output path for the program in the cluster. This path should not pre-exist before the program starts (having existing folders as output dir will crash the program). Hence we delete the output path if it exists before starting the job. The _SUCCECSS folder in this dir represents that the job was executed without errors.
- You need to re-export the jar (can use hadoop-vm-works.jardesc) if changes are done to Mapper or Reducer code (classes which extend Mapper and Reducer)
package com.kartikiyer.hadoop.wordcount;

import org.apache.hadoop.conf.Configured;
import org.apache.hadoop.fs.FileSystem;
import org.apache.hadoop.fs.Path;
import org.apache.hadoop.io.IntWritable;
import org.apache.hadoop.io.Text;
import org.apache.hadoop.mapreduce.Job;
import org.apache.hadoop.mapreduce.lib.input.FileInputFormat;
import org.apache.hadoop.mapreduce.lib.input.TextInputFormat;
import org.apache.hadoop.mapreduce.lib.output.FileOutputFormat;
import org.apache.hadoop.mapreduce.lib.output.TextOutputFormat;
import org.apache.hadoop.util.Tool;
import org.apache.hadoop.util.ToolRunner;

public class WordCountClient extends Configured implements Tool
{
    public static void main(String[] args) throws Exception
    {
        System.setProperty("hadoop.home.dir", "C:\winutils-master\hadoop-2.7.1");
        System.setProperty("HADOOP_USER_NAME", "cloudera");

        ToolRunner.run(new WordCountClient(), args);
    }

    @Override
    public int run(String[] args) throws Exception
    {
        Job job = Job.getInstance();
        job.setJobName("WordCounter");
        job.getConfiguration().set("mapreduce.app-submission.cross-platform", "true");

        job.setJarByClass(getClass());
        job.setMapperClass(WordCountMapper.class);
        job.setReducerClass(WordCountReducer.class);

        job.setOutputKeyClass(Text.class);
        job.setOutputValueClass(IntWritable.class);

        job.setInputFormatClass(TextInputFormat.class);
        job.setOutputFormatClass(TextOutputFormat.class);

        Path in = new Path("/user/cloudera/input");
        FileInputFormat.addInputPath(job, in);

        FileSystem fs = FileSystem.get(job.getConfiguration());
        Path out = new Path("/user/cloudera/output");

        if (fs.exists(out))
            fs.delete(out, true);

        FileOutputFormat.setOutputPath(job, out);

        return job.waitForCompletion(true) ? 1 : 0;
    }

}
